Xpel Armor for Front BumperUpdated 8 months ago
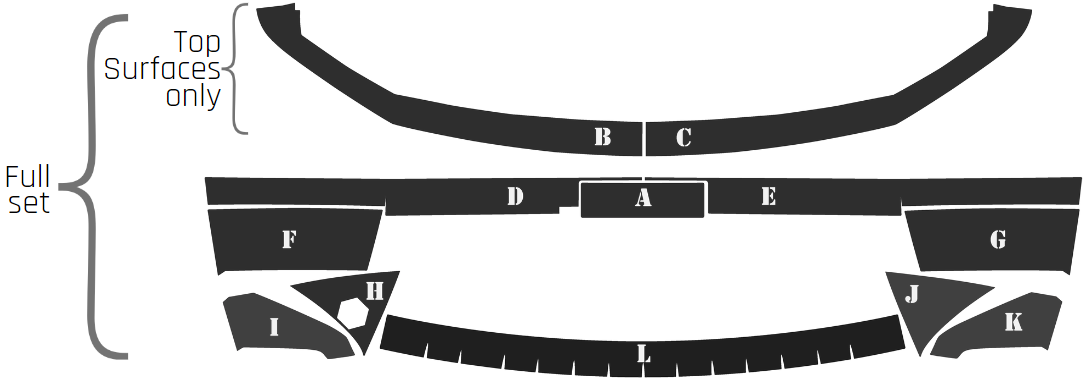
Shown below is the position for each piece on your Cybertruck front bumper protection.
If you're installing the full set, we recommend applying each piece in alphabetical order.
Please watch the installation video - it’s super easy, but there’s a couple of important tips.
If the Armor is curled after shipping, just lay it out flat(ish) for a few minutes and it'll soon flatten out.
Here's a step-by-step guide on how to install armor protection for your Cybertruck front bumper, based on the video:
What's Included
- Depending on your order, you'll receive either the top surface pieces or a full set including the top and additional sections [00:41].
- A double-sided squeegee is also included [00:54].
Preparation
- Clean the plastic surface of the bumper to remove any residue, especially from plastic enhancers like Armor All [01:00].
Installation Steps
- The video recommends installing the pieces in alphabetical order, using the chapter markers for navigation [01:17].
- Piece A: Line it up on the plastic insert [01:30].
- Piece B: Align with the corner and slight turn on the top surface [03:39].
- Piece C: Mirror of piece B on the opposite side [06:51].
- Piece D: Runs along the side [10:37].
- Piece E: Mirror of section D, without a camera cutout [13:01].
- Piece F: Line up with the edge [20:09].
- Pieces J & K: For these sections, the curved edge aligns along the side [17:06].
- Piece K: Clean the area thoroughly [18:41].
- Piece F: Line up the top line [20:16].
- Piece H: Similar to J, but with a speaker cutout [21:55].
- Piece I: Line up on the edge [23:47].
- Let it find its natural position [24:10].
- Final Piece: Start at one end and work your way down [25:00].
Finishing Up